EXTRACTION MAPS
TACTICAL GUIDES & STRATEGIES
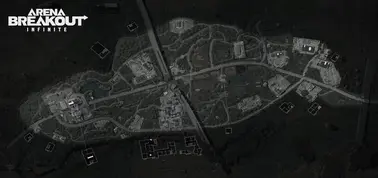
FARM - EXTRACTION GUIDE
Medium-Sized Map
Farm is a versatile medium-sized map featuring agricultural buildings, open fields, and dense tree lines. This map offers multiple playstyles, from long-range engagements across crop fields to close-quarters combat in barn complexes. Success on Farm requires balancing aggression with caution, as visibility varies dramatically between open areas and covered positions.
Key Features
Extraction Points
- North Farm Gate (always available)
- South Bridge (timer-based)
- East Fence Line (conditional)
- West Forest Path (secure)
High-Value Loot Spots
- Main Farmhouse - weapons cache
- Grain Silo - medical supplies
- Equipment Shed - attachments
- Underground Bunker - rare items
Danger Zones
- Open crop fields - sniper exposure
- Main barn complex - hotly contested
- Central road - high traffic
- Boss spawn area - extreme danger
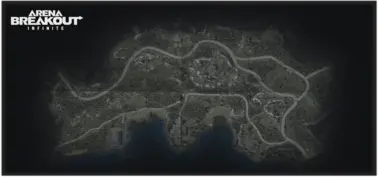
VALLEY - TACTICAL GUIDE
Large Map
Valley is an expansive map characterized by elevation changes, river systems, and scattered industrial complexes. The terrain heavily favors players who understand positioning and long-range engagements. Navigation requires careful route planning as moving between zones often exposes you to multiple sightlines. Master the high ground, and you'll control the valley.
Key Features
Extraction Points
- Hillside Extraction (elevation required)
- River Crossing (water route)
- Mountain Pass (secure but distant)
- Vehicle Extraction (keys needed)
High-Value Loot Spots
- Sawmill Complex - industrial loot
- Radio Tower - military gear
- Riverside Compound - varied loot
- Crashed Helicopter - high-tier
Tactical Positions
- Observation Ridge - best overview
- Bridge Overwatch - choke point
- Forest Treeline - concealment
- Rocky Outcrops - cover positions
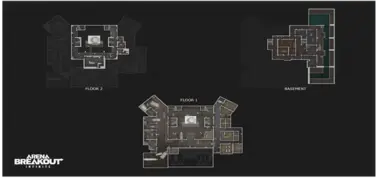
ARMORY - HOT ZONES
Small Map - High Risk
Armory is a compact, high-intensity map centered around a military storage facility. Every inch of this map is potentially hostile, with tight corridors, multi-level buildings, and countless ambush points. The loot quality is exceptional, but expect constant combat. Quick reflexes and aggressive tactics are rewarded, while hesitation is punished.
Key Features
Extraction Points
- Main Gate (heavily contested)
- Drainage Tunnel (underground)
- Roof Helipad (requires access)
- Breach Point (tactical exit)
High-Value Loot Spots
- Weapons Vault - top-tier weapons
- Officers' Quarters - rare keys
- Supply Room - attachments/mods
- Command Center - intelligence
Combat Zones
- Central Courtyard - deadly crossfire
- Main Building - CQB hell
- Perimeter Walls - sniper positions
- Underground - maze-like corridors

NORTHRIDGE - ROUTES
Urban Map
Northridge is an urban warfare environment featuring residential blocks, commercial centers, and underground metro systems. The map's complexity comes from its verticality and interconnected buildings. Rooftop access, window positions, and interior navigation create a three-dimensional battlefield where threats can come from any angle. Knowledge of optimal routes is essential for survival and successful extraction.
Key Features
Extraction Points
- Metro Station (underground route)
- Rooftop Evacuation (vertical)
- Street Checkpoint (patrolled)
- Parking Garage (vehicle)
High-Value Loot Spots
- Bank Vault - cash & valuables
- Police Station - tactical gear
- Hospital - medical supplies
- Electronics Store - tech loot
Safe Routes
- Alleyway Network - covered movement
- Sewer System - underground travel
- Rooftop Pathway - elevated route
- Building Interiors - avoid streets
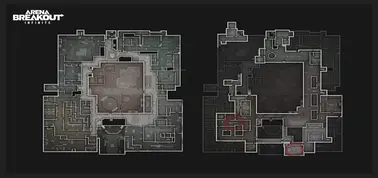
TV STATION - ROUTES
Close-Quarters/Interior Map
The TV Station is a highly compact and dangerous interior map defined by tight corridors, multi-level studios, and numerous sightlines. Combat is almost exclusively close-quarters, demanding excellent reaction time and sound awareness. The map's design heavily favors ambush tactics and careful room clearing. Key objectives are often heavily defended by high-tier operatives, making every push a high-stakes gamble.
Key Features
Extraction Points
- Loading Dock (highly contested, vehicle)
- Studio Ventilation Shaft (one-time use, limited access)
- Heliport Rooftop (conditional, flares needed)
- Main Entrance (risky, heavily exposed)
High-Value Loot Spots
- Server Room - valuable electronics & data chips
- Director's Office - key cards & cash safes
- News Anchor Desk - small, quick-grab valuables
- Security Checkpoint - high-tier armor/weapons caches
Safe Routes
- Maintenance Tunnels - avoid central areas, slow
- Back Stairwells - quieter movement between floors
- Vents/Ducts - limited access, stealth movement
- Fire Escape (Exterior) - bypass interior choke points